This post was originally published on August 8, 2021, and updated on February 16, 2023.
Ready to start planning your road trip using the power of Google Maps?
Then you’ve come to the right place.
Google has two amazing tools to help you plan your road trip: Google Maps and Google My Maps.
Google Maps is a great tool for plotting out your route, while Google My Maps is an amazing tool for road trip planning and organization.
In this post, I’ll teach you how and when to use each of these powerful free tools.
Let’s start by looking at Google Maps since it’s the simpler of the two.
But if you are looking for how to use Google My Maps, then click here.
Jump To
How to Use Google Maps to Plot Your Road Trip Route
Google Maps is a great tool if you want to plot out your road trip route.
We use it as a starting point for all of our road trip planning to get a sense of how long our trip will be or what we can accomplish in the time we have.
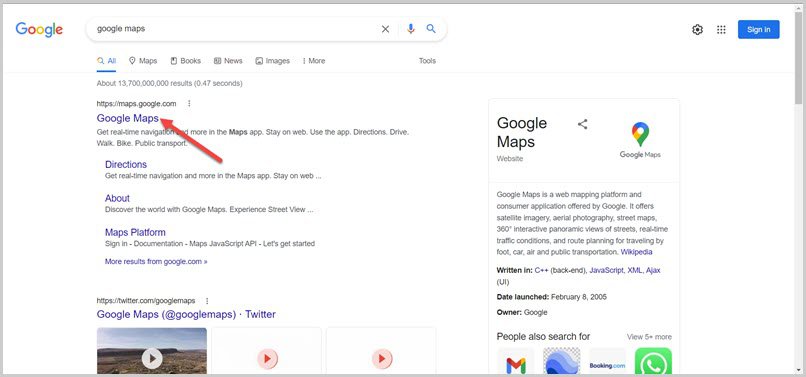
Step 1: Open Google Maps
Start by opening up Google Maps on your desktop or phone.
When trip planning, we like to use our desktop computers to make use of the bigger screen.
Step 2: Plot Your Road Trip Route
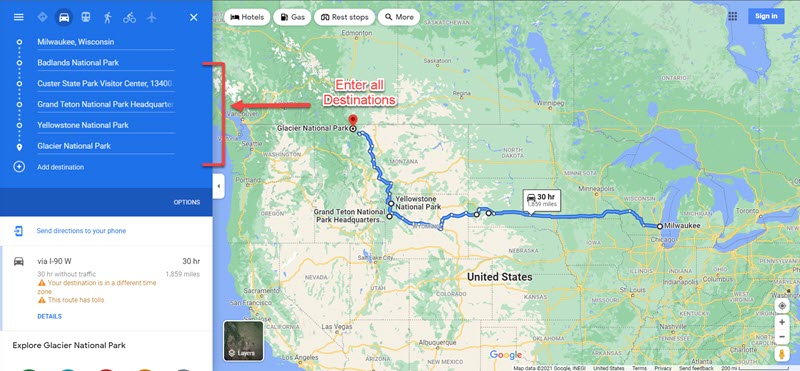
To start plotting your road trip route, click on directions.
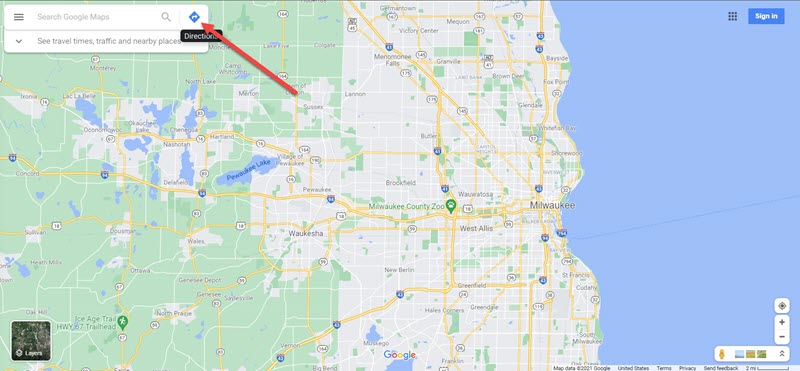
Then enter your starting point and your first destination.
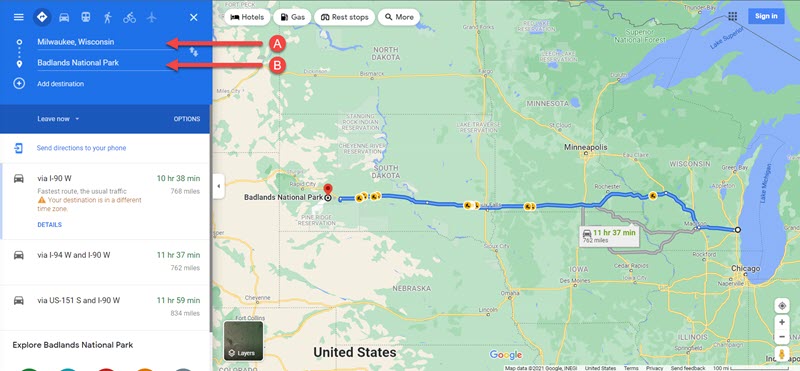
Continue to add stops to your road trip by clicking on the (+) to add destinations.
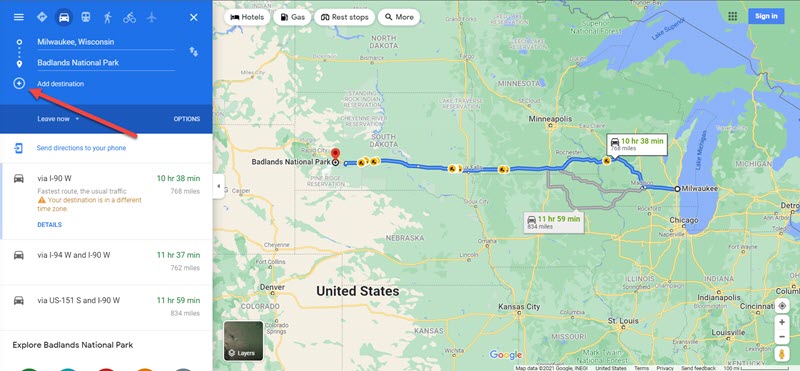
Stop when you have all your road trip stops added to your map. Google Maps allows you to add up to 10 points to your map. If you want to add more, then Google My Maps is the tool for you.
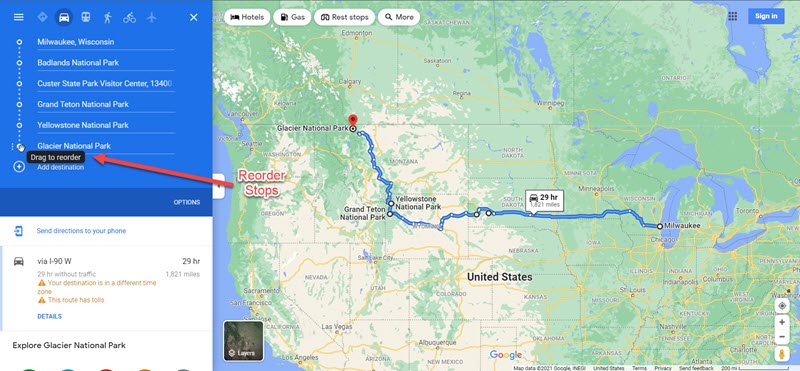
Step 3: Reorder Road Trips Stops
If you want to play around with your route and reorder your stops, Google Maps makes it easy to do so.
On the left, where your stops are listed, you can drag and drop the stops to reorder them.
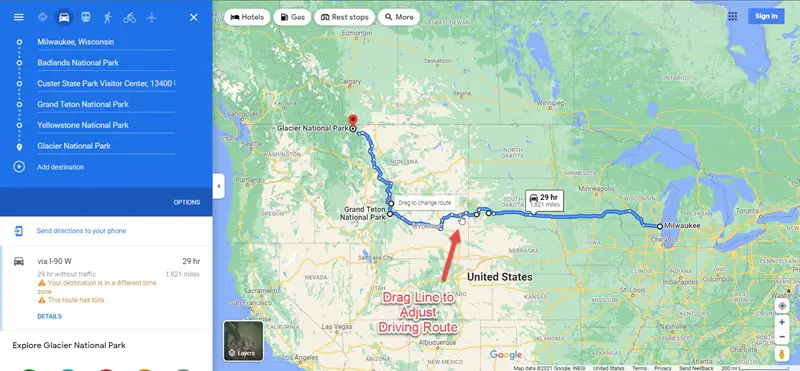
Step 4: Move the Driving Route
Google Maps will choose the fastest route between your road trip stops. But sometimes, there may be a scenic route you want to take.
You can easily move your driving route as desired by dragging and dropping your route.
Step 5: Send the Driving Route to Your Phone
Once you plan your road trip, you can send the directions to your phone for easy access during your trip. Directions can be sent via text message or email.
Note: You will have to have a Google Account to send directions to your phone.

Google Maps is a great starting point for planning a road trip.
But if you want to harness the power of Google and use it to plan your road trip and as a resource throughout your trip, Google My Maps is the choice for you.
Google My Maps: The Best Road Trip Planning Tool
Planning a road trip can be a daunting task. It’s hard to know where to start, and all the research can feel overwhelming. But that is where the ultimate road trip planning tool, Google My Maps, comes to the rescue.
Google My Maps is a very similar tool to traditional Google Maps, but it’s much more powerful and customizable.
In this section, we’ll start with detailed information on the features of Google My Maps. And then, we’ll get into exactly how we use Google My Maps to plan each one of our road trips.
Using this tool will help you seamlessly organize and plan your road trip.
Once we tried it, we never looked back.
Let’s start by giving you a little introduction to Google My Maps.
What is Google My Maps?
Google My Maps utilizes all of the data in Google Maps to allow you to create your very own custom map for your road trip. It’s a way for you to create a map containing the places important to you.
Once you create your map, you can access all of the personalized information you’ve added, so you never miss a beat while on the road.
Why is Google My Maps the Ultimate Road Trip Planning Tool?
Google My Maps is our favorite tool for planning a road trip. Here is why:
- It Helps You Visualize Your Trip
Plotting all of your points of interest on a map helps see how your road trip may take shape. At the start of road trip planning, we typically have no idea what route we may take until we see all of the things we want to do on a map. And this is where Google My Maps can help. - It Helps Organize Your Research
When planning a road trip, you are likely gathering information from many sources, including websites, tourist bureaus, and recommendations from friends and family. Google My Maps can help you organize all of your research so you can more easily plan your road trip itinerary. - It Consolidates Your Entire Itinerary
Using Google My Maps allows you to have all of your road trip information in one place. There will be no need for a separate spreadsheet with your day-to-day itinerary or to bring your travel books with you.
What Are the Limitations of Google My Maps?
- Google My Maps Can Not Be Used Offline
You will need access to wifi or cellular data to use your map on your road trip. But don’t let that stop you from using it to plan your road trip. There are ways to download your map to other apps for offline use, which I’ll take you through in the tutorial. - You Can Only Add 2,000 Locations to Your Map
Likely, you will not need over 2,000 locations when planning your road trip. And if you do, you can make separate maps, possibly divided by days or weeks, to get around this limitation. - You Can Only Add 10 Layers to Your Map
Layers are ways to categorize your location points. When using Google My Maps, you can only have ten layers per map.
- Planned Routes Can Not Be Accessed for Driving Directions on Google Maps
When planning your trip, you may add a direction layer on your map to display the route you plan to take. Unfortunately, you can not use those directions to give you turn-by-turn navigation on your road trip. You’ll have to use Google Maps or click on a destination point on your custom Google My Map to bring up directions. I go through this in detail here.
How to Use Google My Maps to Plan a Road Trip
Now that you know why Google My Maps is the best road trip planning tool, let’s dive into the nuts and bolts of Google My Maps.
We’ll start with an in-depth overview and then show you exactly how we use Google My Maps to plan our road trips. Use the screenshots I’ve provided to help guide you through all of the steps.
Overview of Google My Maps
If you want to know how we use Google My Maps to plan our road trips, then feel free to skip down to the step-by-step guide for planning a road trip here.
But if you want to learn the ins and out of Google My Maps, this is where to start.
You can start from the beginning or jump to the section you want to learn more about by clicking on the links below.
Here is what we will cover to familiarize you with how Google My Maps works so you can start road trip planning like a boss.
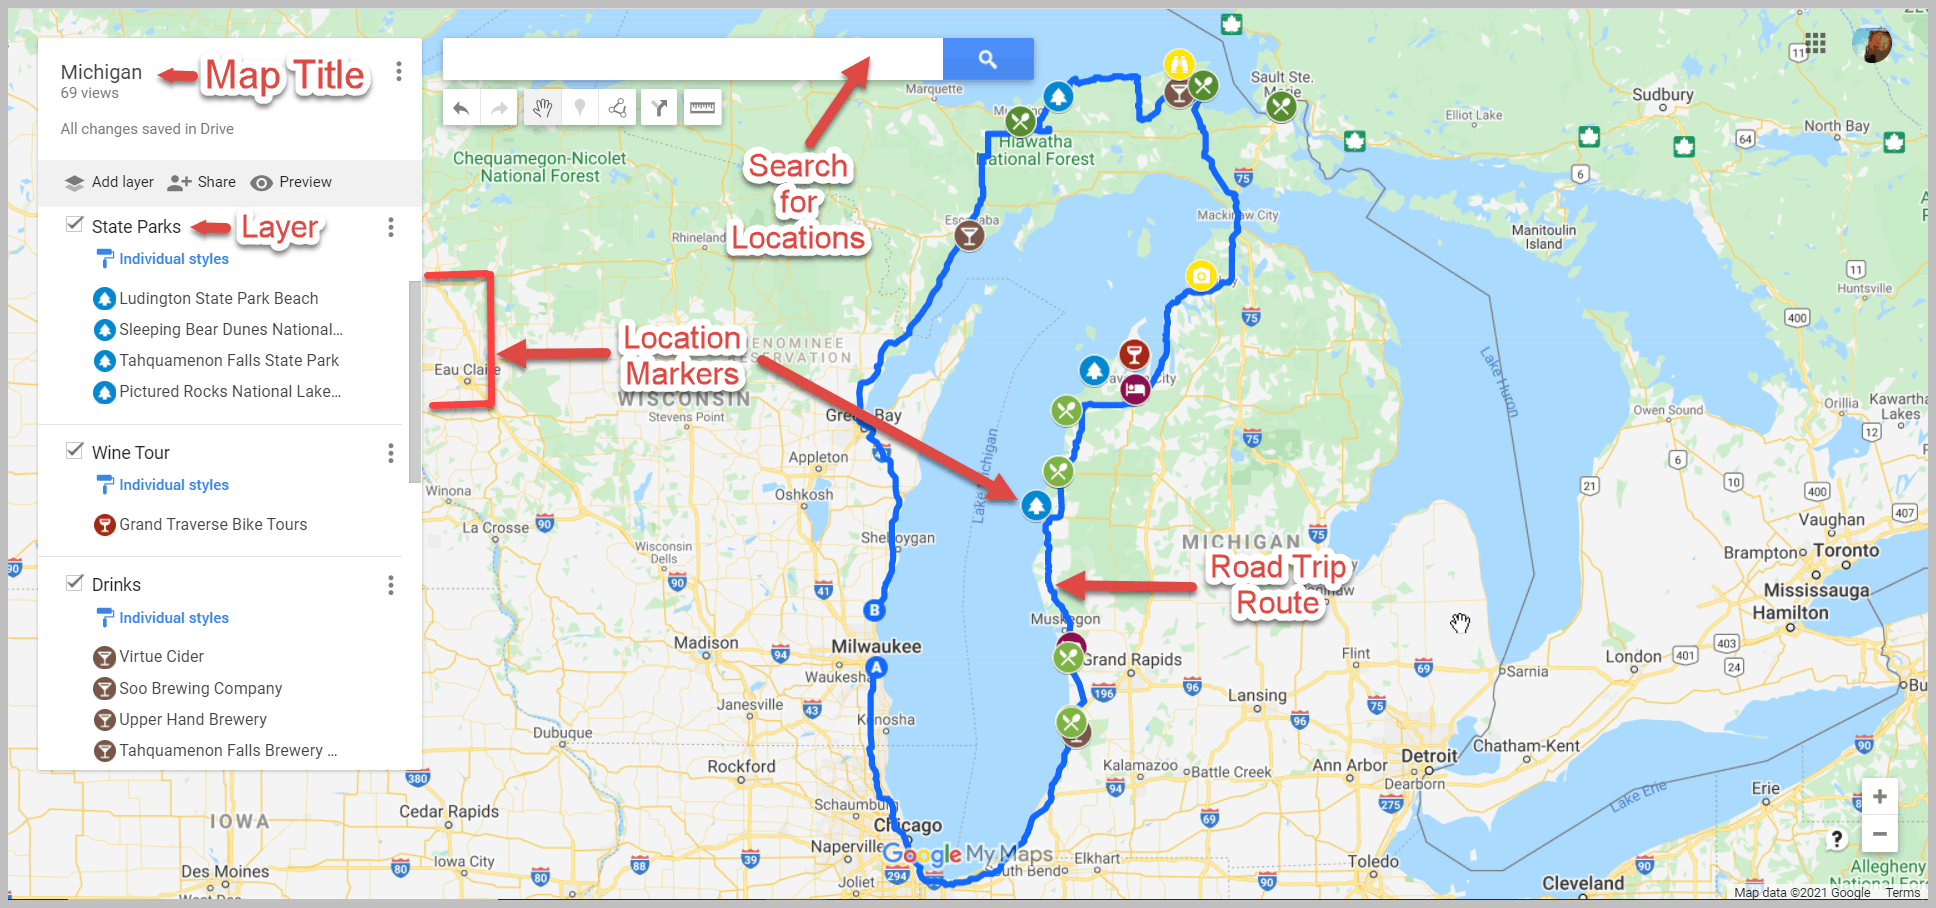
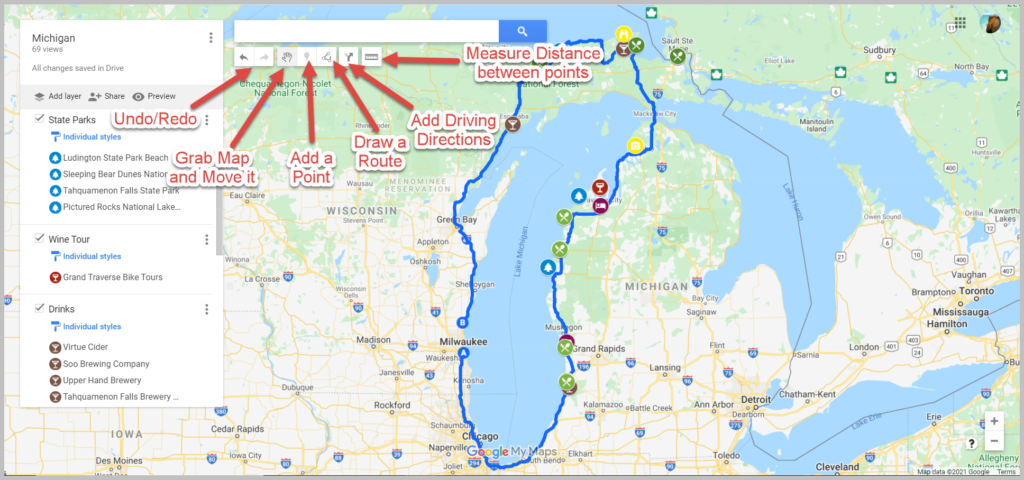
Google My Maps Layout
Google My Maps allows you to add locations and driving directions to your map while allowing you to organize them as you wish.
To get started, let’s get familiar with the layout of Google My Maps.
I suggest creating your first Google My Map and playing around with the functions of the map to help you get familiar with them.
Note: You must either create a Google Account or sign in to your Google account to start using Google My Maps.
Location Markers
Location markers are points that you add to a map. They can be things like restaurants, hotels, sights-to-see, bathroom stops, etc.
Find things to do along your route with our Favorite Tools to Find Things to Do Along Your Road Trip Route.
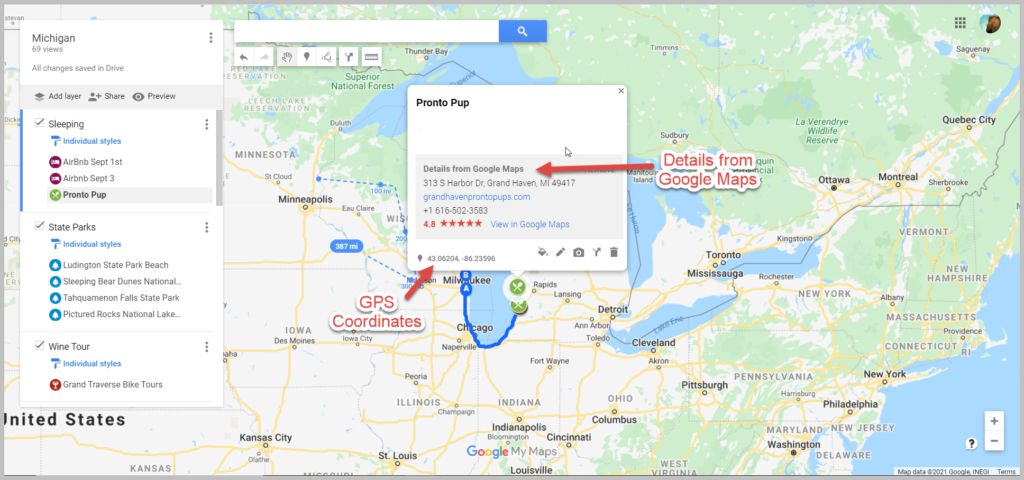
Each point you add to a map will include any information that Google already has for that point.
These include things like:
- GPS coordinates
- Address
- Website address
- Phone Number
- Reviews
Three Ways to Add Markers to Your Google My Map
You can add markers to your road trip map in three ways:
- Using the search function
- Selecting a Point already on Google Maps to add to your own map
- Add a point manually
Let’s look at how to do all three.
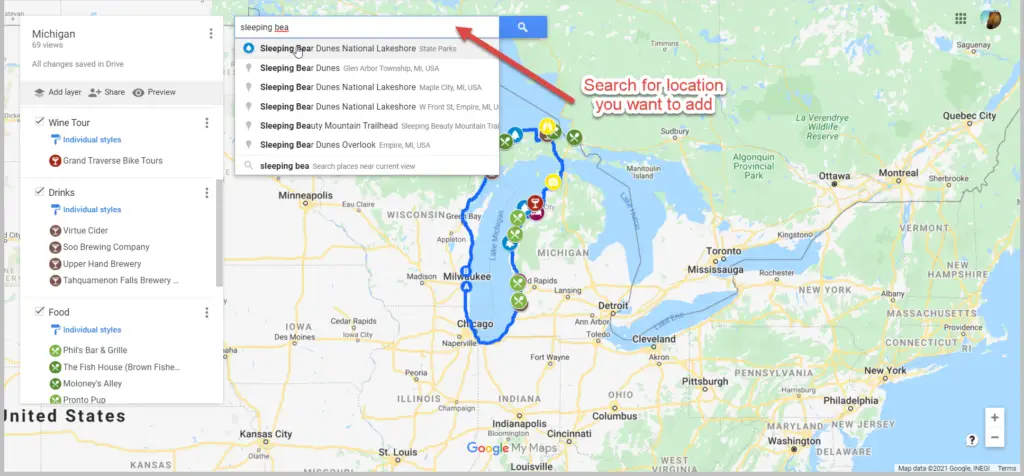
Search Function
You can find a marker by typing in the name, address, or GPS coordinates into the search bar.
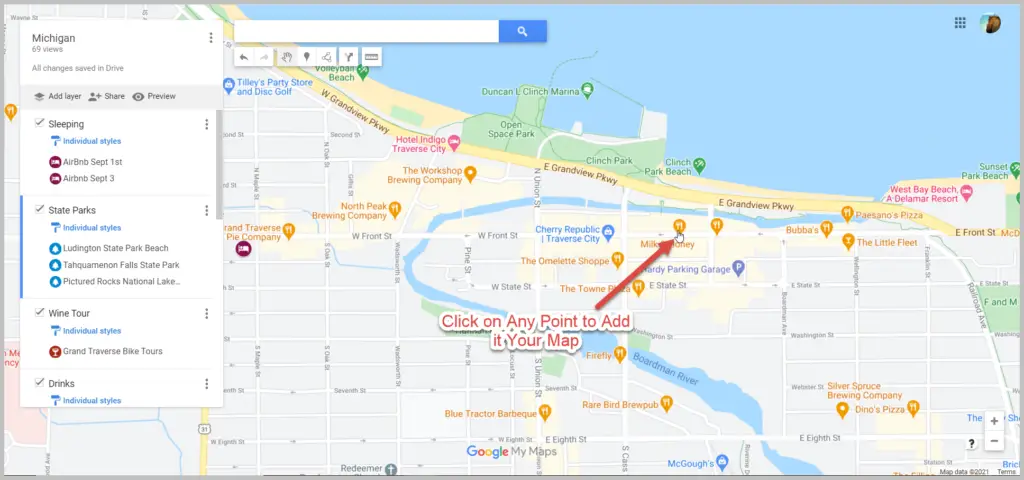
Adding a Marker That is Already on Google Maps
Google Maps already has many markers in its database. When you zoom into an area, many points of interest will start to show up. If any of these markers look appealing to you, you can add them to your own map by clicking on them.
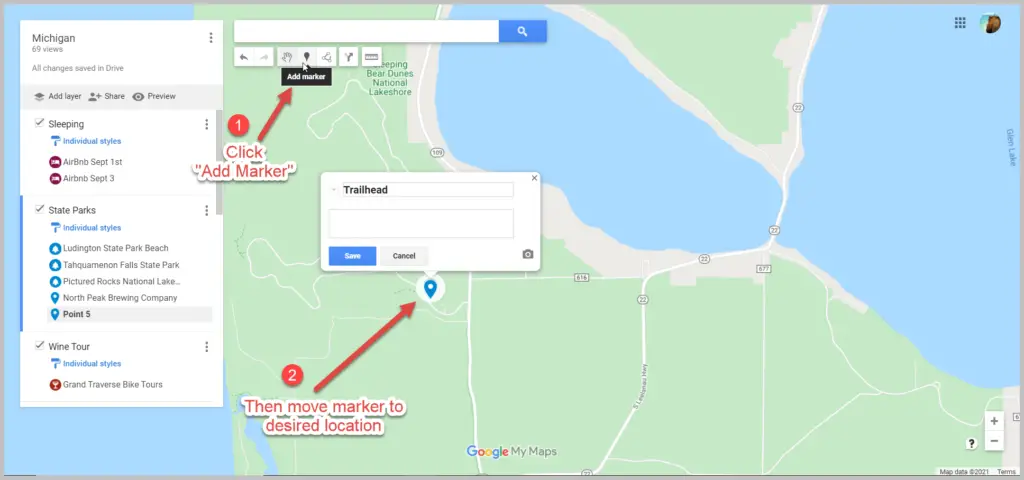
Adding a Marker Manually
You may need to add markers manually when you can not find them via the search function and don’t have the location’s GPS coordinates.
For example, sometimes, I struggle to find the exact location of a trailhead via the search bar. In these cases, I find the location of the trailhead via a different resource and plot it on the map myself.
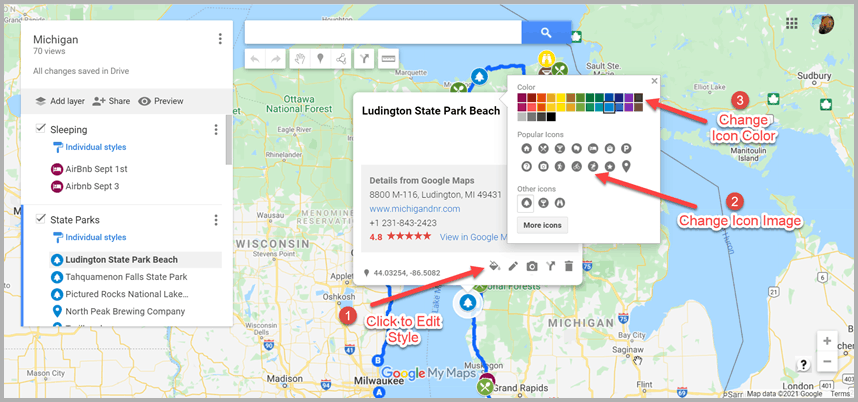
Color Code and Change the Icons of Your Markers
To keep your map organized, you’ll want to customize and color-code your icons to help you group locations together.
Luckily, Google lets you fully customize your markers.
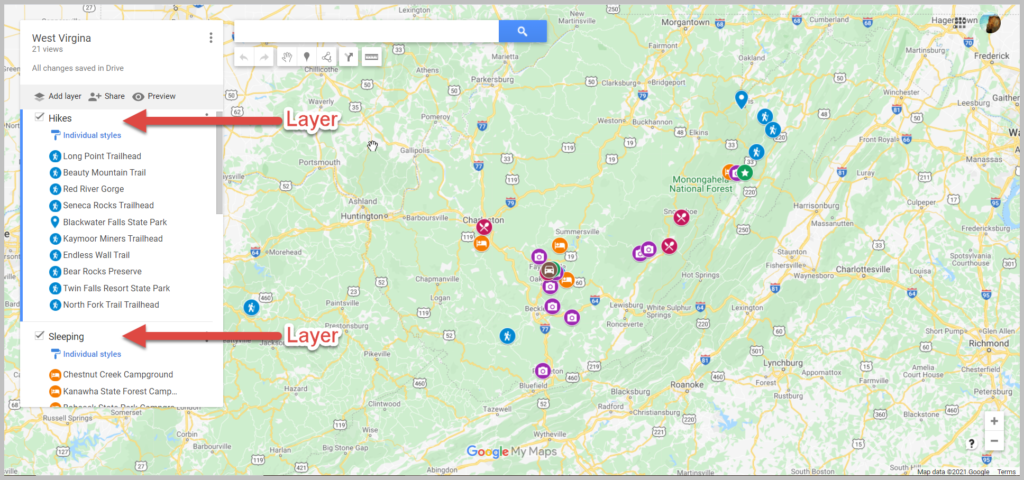
Map Layers
Map layers are a great way to organize your maps.
But before we dive into adding layers, let’s talk about map layers.
What are Map Layers?
A map layer is a set of markers that are layered on top of an existing map. You can see your different layers on the left-hand side of your map.
When you add a marker to a map, Google My Maps will add it to a layer. You can then use these layers to organize your map.
The added marker will appear on the selected layer. If you want to move a marker to a different layer, click and drag that marker to the desired layer.
For example, I made a map of Wisconsin Campgrounds to help me find campgrounds nearby during our road trips.
I have chosen to use separate layers for different types of campgrounds; National Forests, State Parks, and County Parks.
The benefit of using separate layers versus adding all of the campgrounds to a single layer is that I can check and uncheck specific layers depending on what information I want to see on my map.
If I don’t want to see the State Parks on my map, I can uncheck “Wisconsin State Parks,” and they will not be plotted on my map until I recheck the box.
How to Add Layers
Within Google My Maps, you can have up to 10 layers on a single map.
To add layers, click on “add layer” on the left-hand side of your map just below the map title and description.
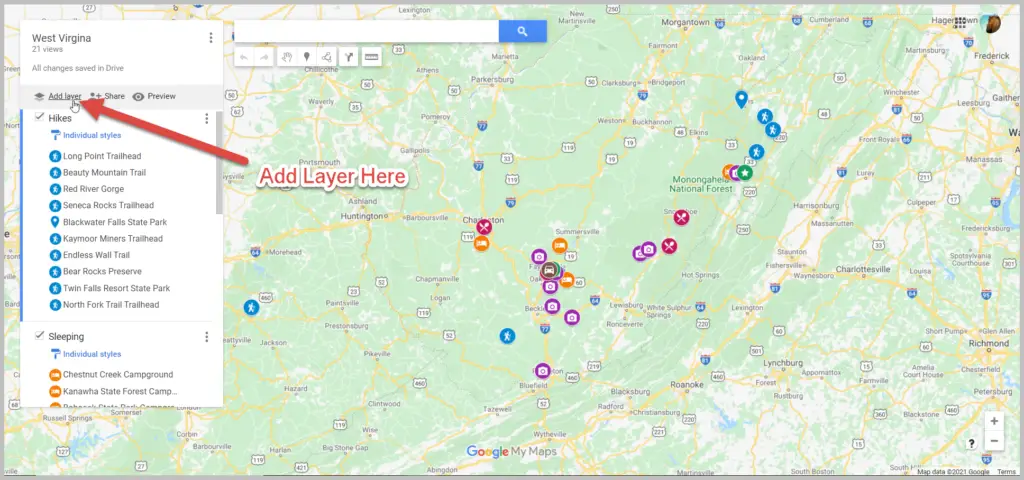
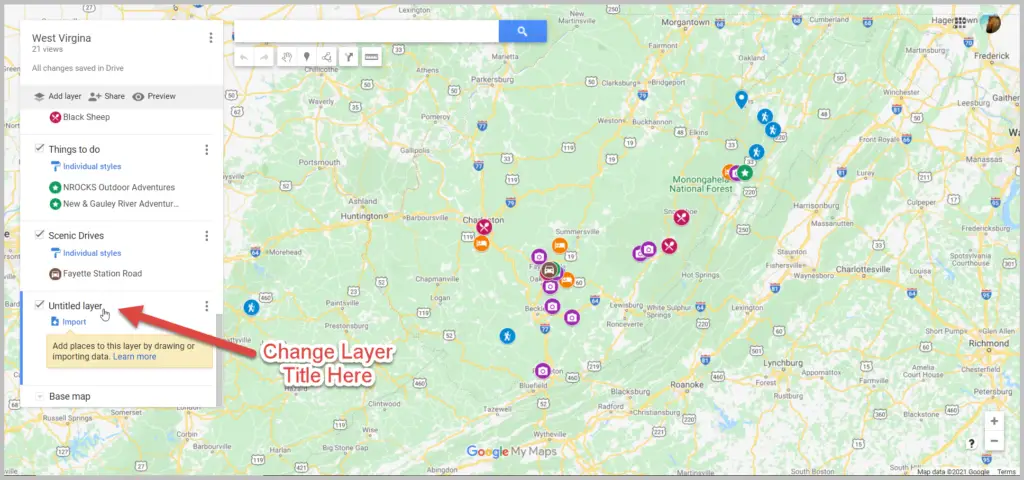
Google My Maps then adds an “untitled layer” to your map.
To change the title, click on “Untitled layer,” and it will give you the option to rename the layer.
The current layer selected will have a solid vertical blue bar on the left side of the layer panel. Any new markers created will be added to the selected layer.
Directions
You can use Google My Maps to plot your driving route. Unfortunately, you can’t use these routes for navigation in Google Maps. This is one of the downfalls of Google My Maps.
But that is not to say that adding driving directions to your Google road trip map isn’t helpful. Adding driving directions helps you visualize your route so you can better understand where you are going while on your road trip. It also will help you figure out how long you can drive in one day.
Here’s how to add and use Directions on your Google Map:
Start by clicking on the direction icon located below the search bar.
You will then continue to add stops along your route to get a visual of your driving route.
Google Maps will default to the quickest route when creating your driving route. The quickest driving route will likely be the main highways and not always the most scenic. Therefore, there may be times you want to deviate from the quickest route and take a more scenic route.
Fortunately, you can adjust your route by dragging it to where you want it to go.
Start by clicking on the route, and a small circle will appear.

Then drag this route to where you want the route to go.
How to Plan a Road Trip with Google My Maps – A Step-by-Step Tutorial
Now that we know the ins and outs of Google My Maps let’s learn how to use it to create your very own customized road trip map.
- Create a New Google Map
- Add Layers for Different Types of Locations
- Add Locations to Your Map
- Plan Your Road Trip Route
Step 1: Create a New Google Map
You will need to sign in to your Google Account or create a new account to create your own Google My Map.
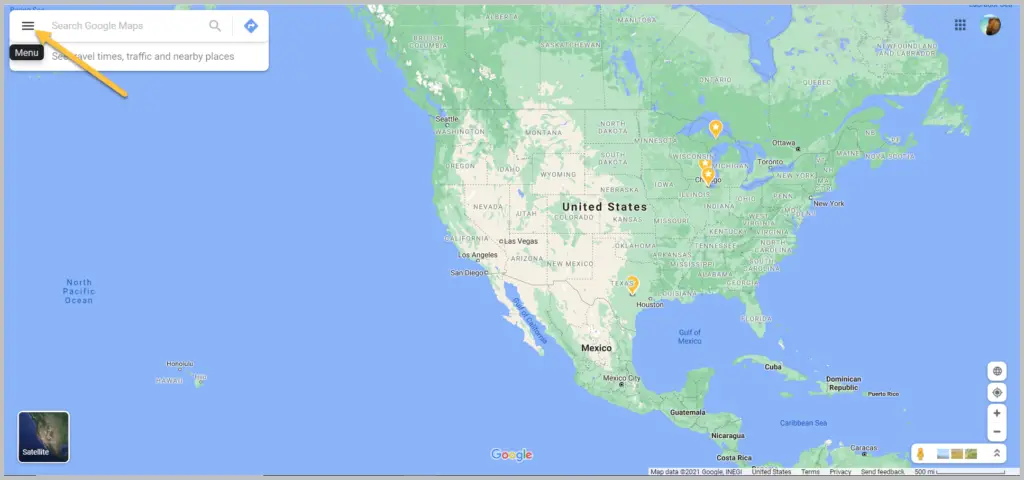
Once you’re logged into Google, follow this link to bring you to Google Maps.
Click on the hamburger ( 𝄘 ) in the top left-hand corner of Google Maps.
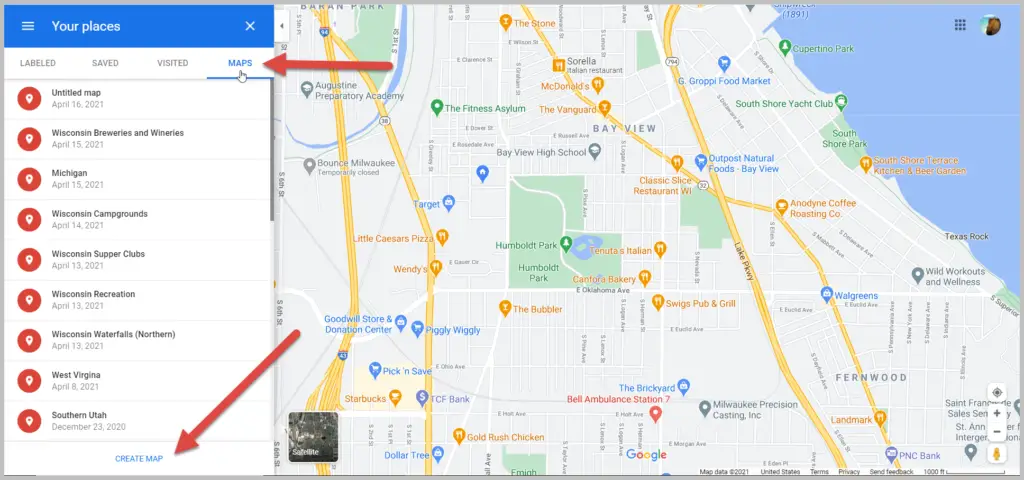
Click on “Your Places”.
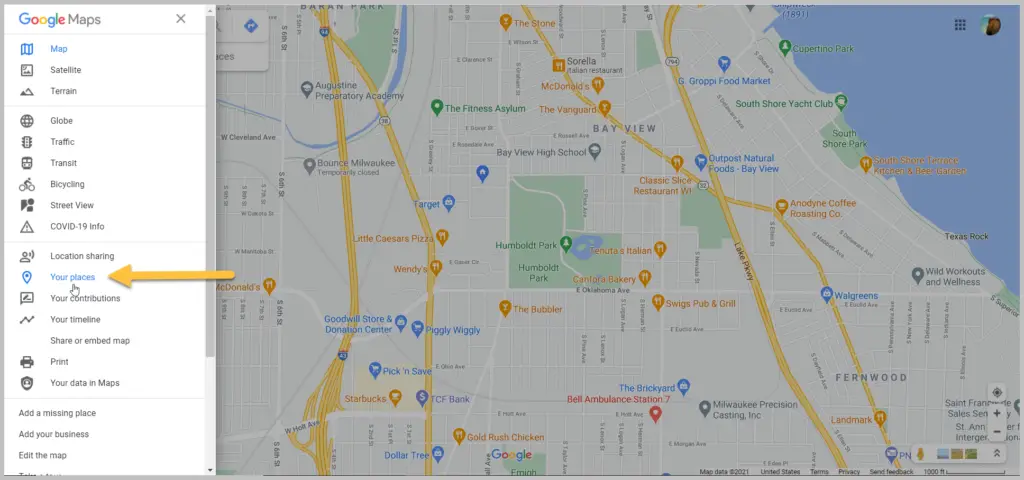
This brings up any saved information you’ve stored in Google maps, like your favorites
Now it’s time to bring up your very first map.
Click on Maps on the top left →, then click “create map” on the bottom left.
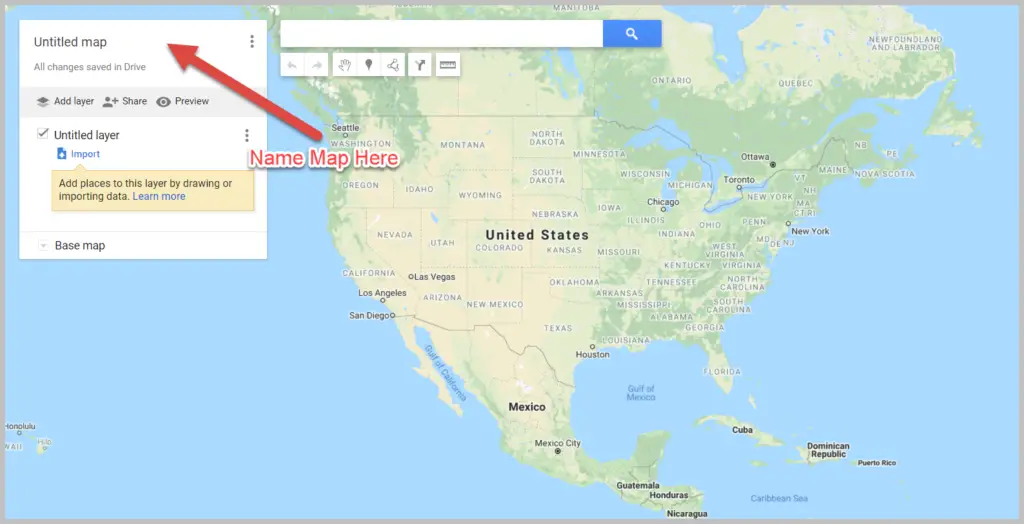
You now have your blank map!
Give your map a title, and get ready to create your first custom road trip map.
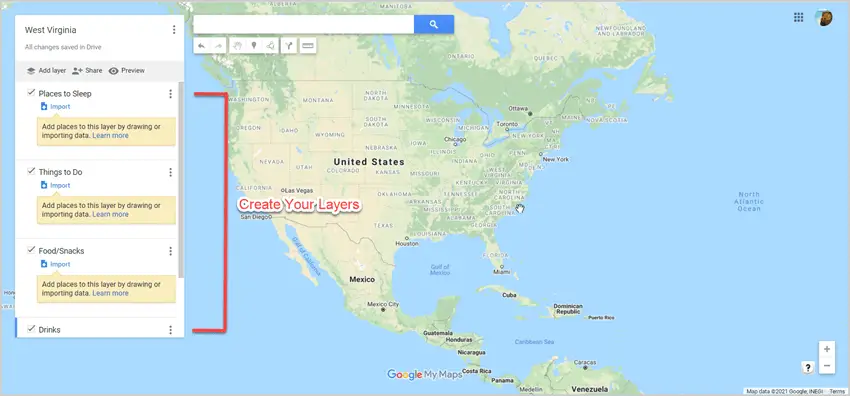
Step 2: Create Layers for Different Types of Markers
I like to start trip planning by creating different layers for the types of markers I plan to add to my map.
The layers I typically use are:
– Places to Sleep
– Places to Eat
– Places to Drink
– Things to Do
You can always add layers while you plan. But I find it easier to stay organized if I start with some layers on my map before adding locations.
Step 3. Add Markers to Your Map
This is the best part of planning your road trip with Google My Maps.
Whether you are in your brainstorming stage of travel prep or you already know where you want to go, this step is where your trip starts to come together.
To start, you’ll research your destinations to find markers to add to your map.
I like to use the following resources for trip research:
- Google: Search for things to do, places to eat, places to stay, etc., in the areas you plan to visit or pass through
- Visitor Centers: Find tourism information online or request info from your destinations’ tourism bureaus to be mailed to you
- Travel books: We like to get ours from the library
- Facebook groups: Join a Facebook Group for the area you are traveling to. They are filled with tons of suggestions on the best things to do in the area.
When you find a location you want to make note of, add it to your map.
Do this by entering it into the search bar.
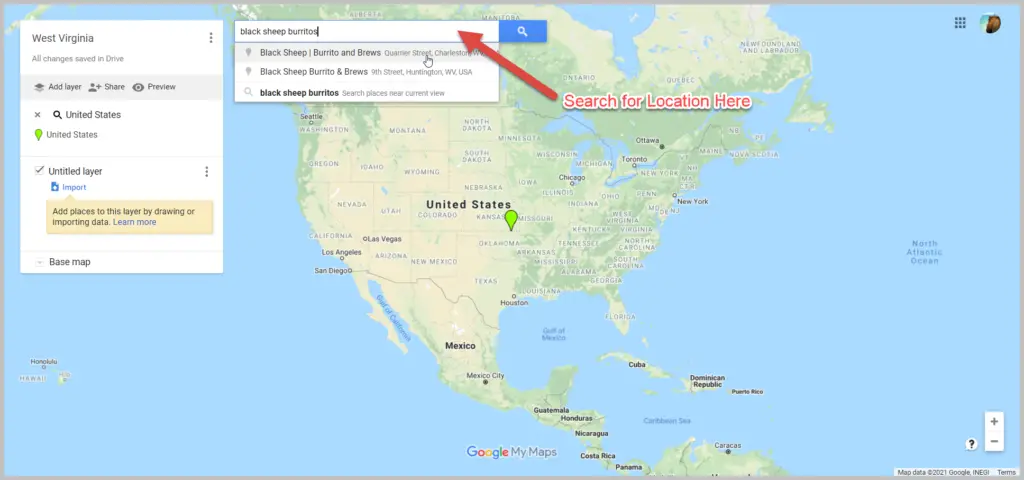
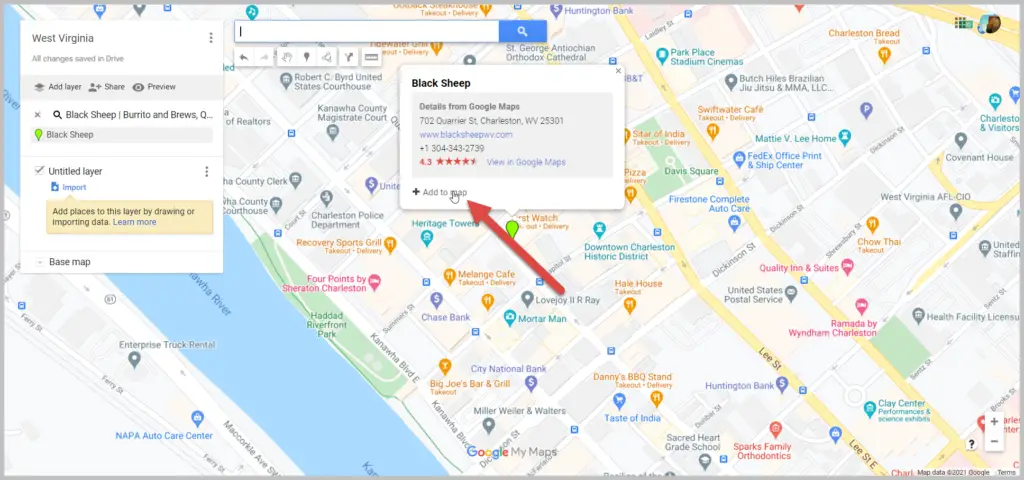
The great thing about Google Maps is that it pulls up all of the information on a location that Google has. If available, you can find the exact address, reviews, and website address.
If the location looks good, you can then add it as a marker to your map by clicking “add to map”.
Once added to your map, you can customize your marker by changing your icon’s color and/or shape by clicking on the paint bucket icon labeled “style”.
I like picking a specific color and icon for each marker category. For example, my “restaurants” may all be blue with a fork and spoon icon, while my “sights to see” will be yellow with a binocular icon.

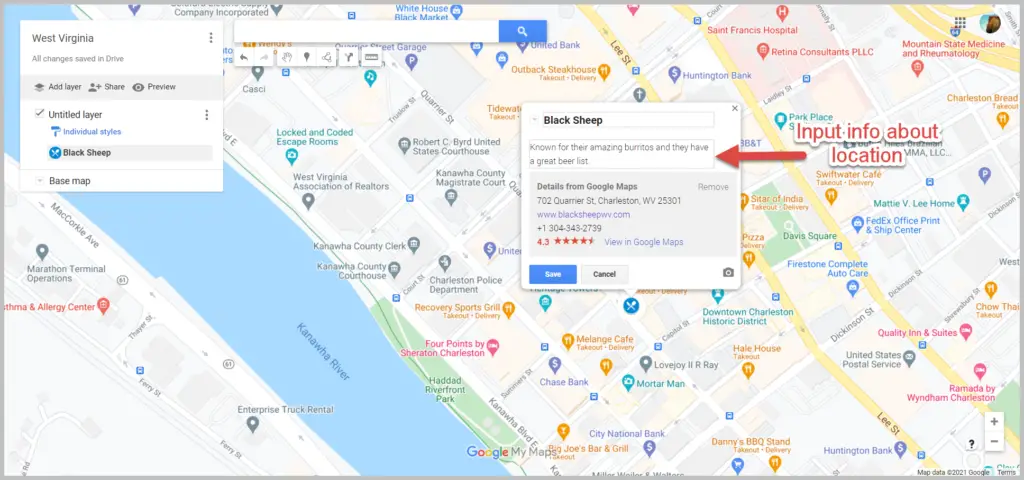
One of my favorite features of Google My Maps is that I can add my own info to the marker. Typically, this info comes from the research I’ve done on the location. If I found a blog post recommending a specific restaurant, I’ll add that to the marker, so I have that info at my fingertips when we are on the road.
Add any info you want to your marker and click save.
Your marker will now be added to your map.
You can see your marker in two places: one on the map and the other in the layer it was added to in the layers menu on the left-hand side of the screen.
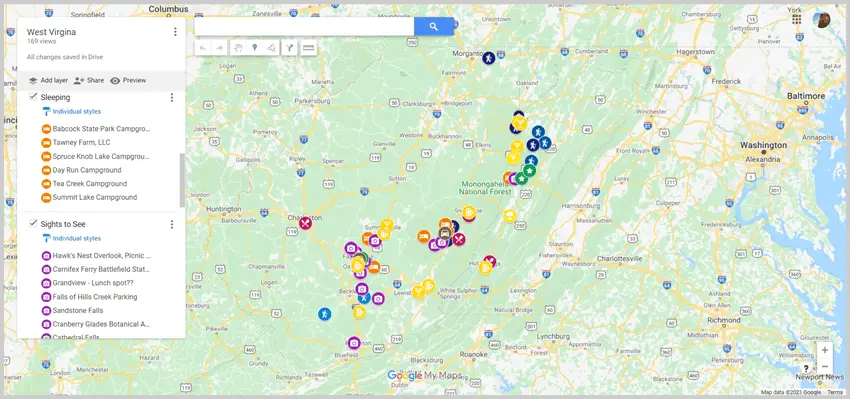
Continue to add locations until your map starts to take shape.
Here is an example of a map we made for a West Virginia Road Trip.
Step 4: Determine Your Route / Itinerary
Now that you have location markers on your map, you can determine your route and day-to-day itinerary.
Take a look at where all your location markers are situated and start planning your route.
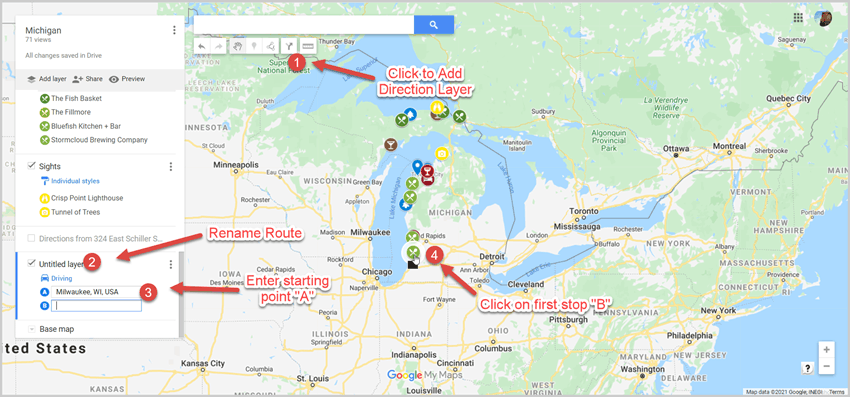
Start by creating a directions layer on your map.
Once you have your directions layer, rename it, and begin plotting your route.
First, you will need to enter your starting point. This can be done by either entering an address manually or clicking on a marker on your map.
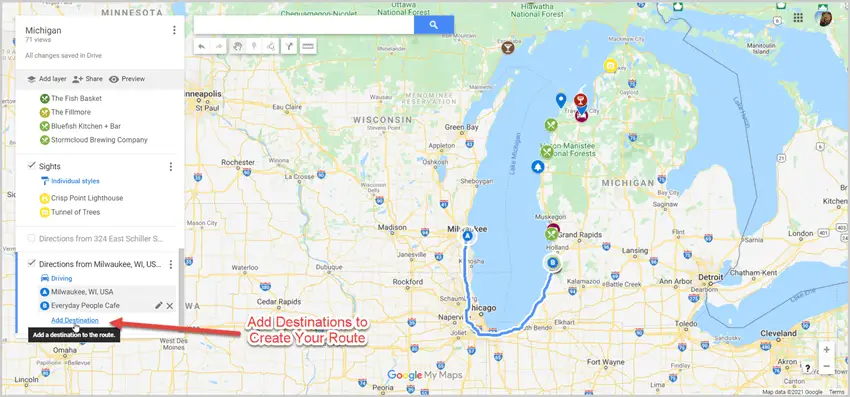
Continue to add stops until your route is complete.
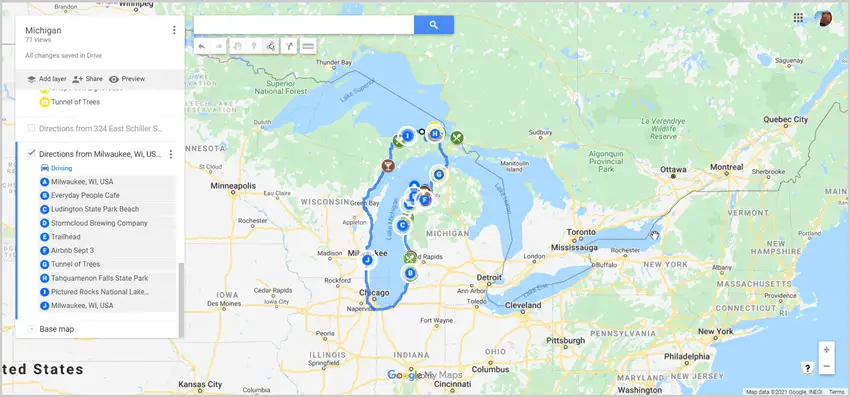
Here is an example of what our Lake Michigan Circle Tour Road Trip looked like.
Google Maps will default to the quickest route from two points.
If you want to go a different route than the one suggested, you can drag the route to force it to go a different way than it was originally displayed.
You now have your own customizable Google Map for your road trip.
We use these maps for both planning our trip and for reference during our trip.
Now let’s look at how to use your awesome map during your trip.
How to View Your Google My Map on Your Phone
Now that you have your map customized, you’ll likely want to be able to view it on your phone.
You will first need to download the Google Maps app from your phone’s app store.
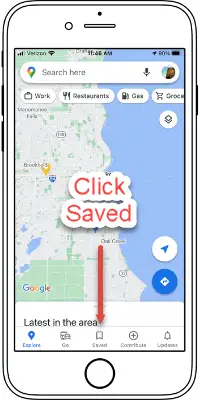
Once you have the Google Map app, here is how you access your map:
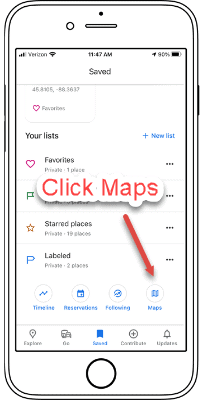
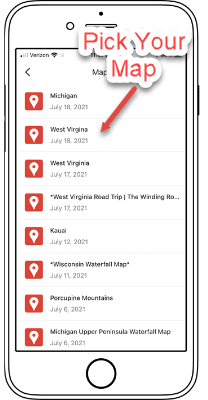
- Click on “Saved” on the lower toolbar on your phone
- Click on “Maps” on the lower right
- Select your customized map
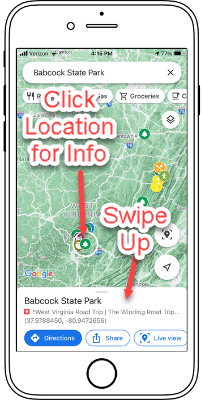
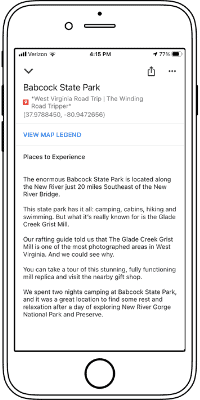
Now you can view your location markers and all the customized information you added to your map.
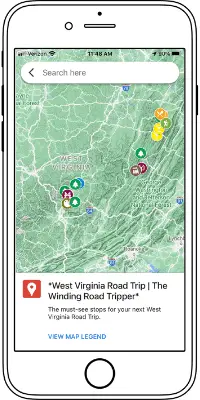
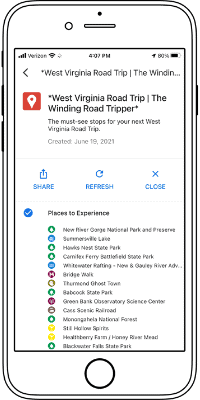
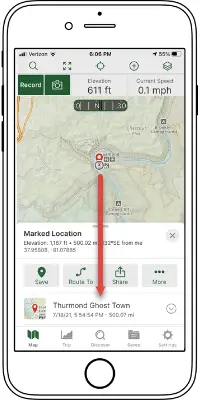
Click on your marker to bring up basic information. For the more detailed information you added, swipe up.
How to Use Your Google Map to Get Directions During Your Road Trip
Unfortunately, you can’t use the turn-by-turn directions you may have added to your map for actual driving instructions for your trip.
But not all is lost; you can still get directions to the next stop by using your customized map and Google Maps.
To do this, click on the location you want directions to and click on directions.
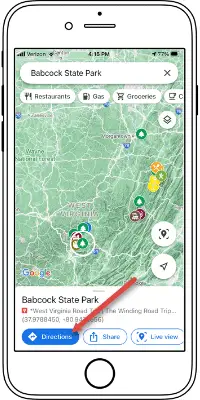
This will launch your Google Map app and allow you to get turn-by-turn directions to your next stop.
How to Export Your Map for Offline Access
Google My Maps works great when you have cell phone service on your trip. Unfortunately, you will not always have service, and you can’t download your Google My Map for offline use like you can in Google Maps.
Thankfully, there are ways to export your map for use offline.
To do this, we use Gaia GPS.
Let’s walk you through downloading your Google My Map for importing into Gaia GPS, an offline mapping app.
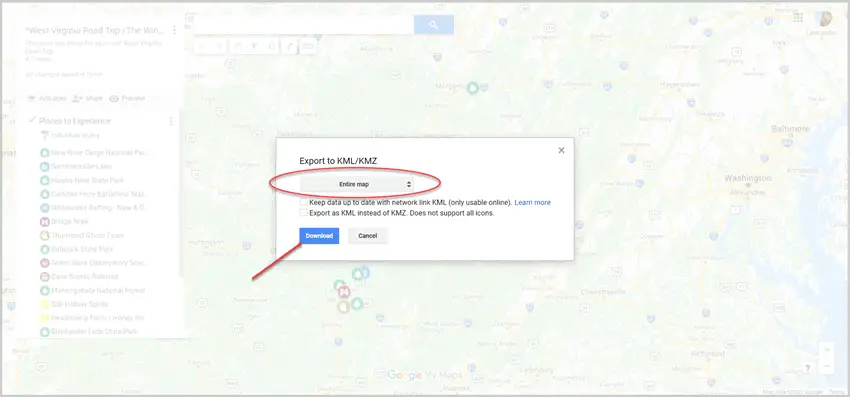
On your computer, click on the ( ⋮ ) in the top left corner by the map’s name. Then click on Export to KML/KMZ.
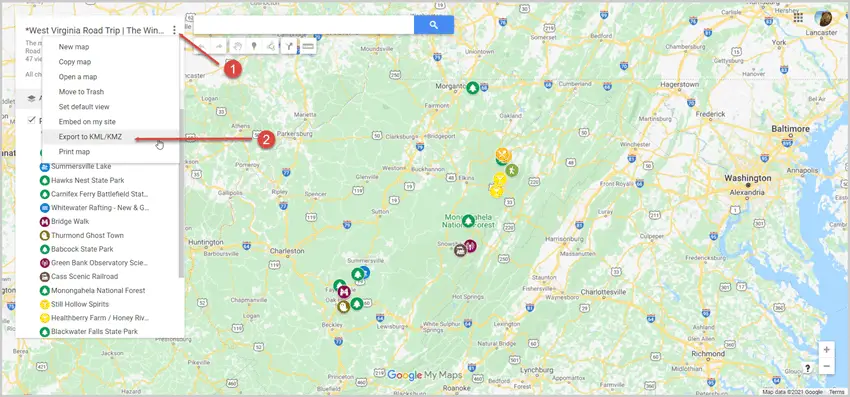
A pop-up will appear. Keep the default of “entire map” and click “download”.
Now you can import this map into Gaia GPS.
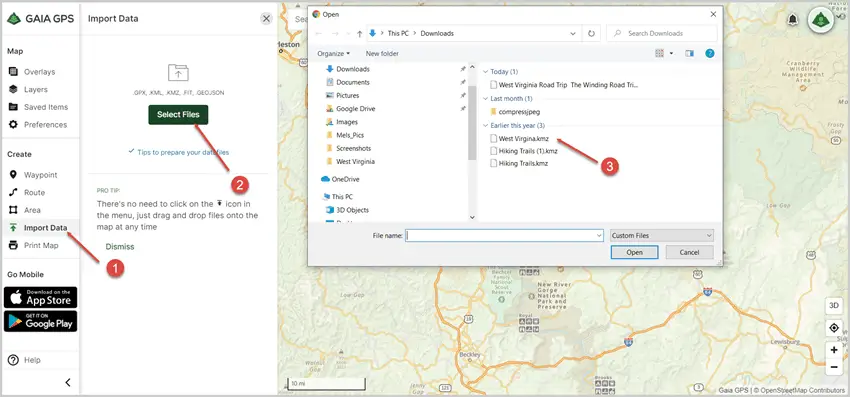
Start by creating a Gaia GPS account.
Once logged in, click “Import Data” and select the .KMZ file you downloaded from Google My Maps.
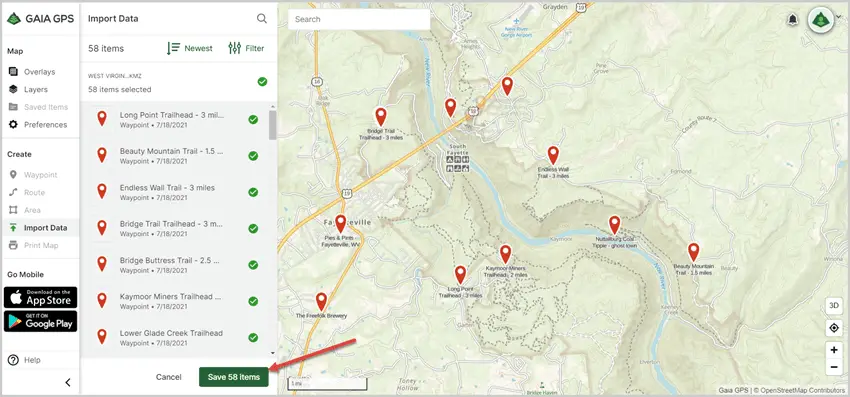
Your locations will now populate in your Gaia GPS map. Make sure to click “save”.
You can now access your map locations offline on your phone via Gaia GPS.
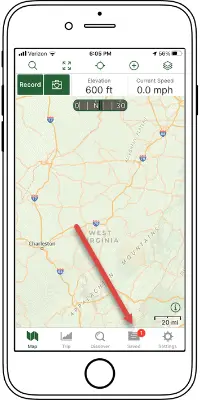
To do this, download the Gaia GPS App on your phone and log in.
Once logged in, you will see a notification that you have a saved location available.
Click on the Saved folder
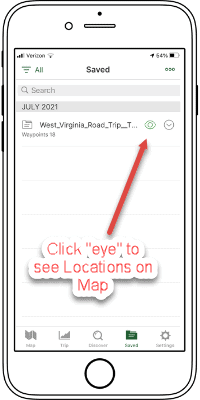
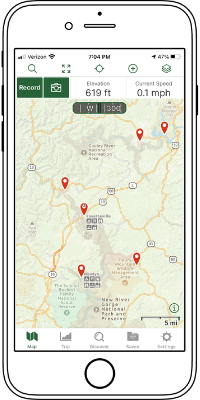
You can now see all your locations on your Google My Map. Including the details, you added.
More Road Trip Tips:
Road Trip Hacks for a Stress-free Trip
Road Trip Activities for a Long Car Ride
Road Trip Meal and Snack Ideas
Money-Saving Tips for Your Next Road Trip
How to Budget for a Road Trip
